Sunday, January 23, 2011

Week #2 - Mirrors in Waiting

It's been months since I bought some cute mirrors at Trees & Trends.  I had some grand plans for them but time didn't allow and then once I'd have time I couldn't decided where I wanted to put them.  Last week tho, once the snow had melted I was getting antsy, I needed a project!  Currently I'm in the myhouseisnolongerdrowninginChristmasdecor&itfeelssonaked mode.  I do like stage because it lets me start fresh - but I get little crazy and then nothing is safe from paint, hot glue, and a nail [really I took something I use on a regular basis and decided I just HAD to hang in on my wall...I may regret that, but so far so good :)]
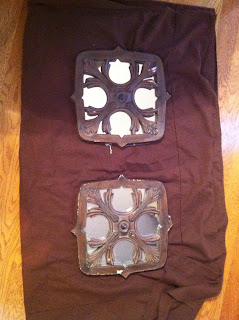
Where were we? Oh right mirrors...So I bought these lovely little numbers a few months ago.
 Oh sure they look great, but look closer...see not so great!
They were the last two left and it looks like they'd seen better days.  When I saw them I thought, "ooo I could totally change them, well if they are a good price" 
Unfortunately THIS is not a good price to me - especially when I'm gonna have to make them look much better.  However, I did feel pretty good since they were marked down from $20. So I kindly asked the clerk if there was any possible way that I could get a discount (sometimes I don't know what comes over me, I think it's all the spray paint fumes that have gone to my head).  By assertive I was and convincing I must of been cause that sweet gal asked her boss and bam - they gave me a discount!  So I walked away with both of these for $14 - that was good for me (I'm pretty sure "me" came back around and was feeling mighty awful for even asking for money off)
So last week I brought an old tablecloth out, put the mirrors on them and got my glaze out.  I was really hoping that the glaze would match perfectly to fill the big knicks.  Buuuut, not so much.  (see that white peeking out there...argh!)
 So then I thought - "oh I have stain left from the table - that would probably cover a bit better and at least stain the white" so I got that out.  It worked much better but I had to rub it over the entire mirror.  Still when I was rubbing on and rubbing off large white spots were peeking through.  
So like any good crafter I resorted to the cure all - enter the brown sharpie!  Oh yay, no we're talking baby!  That sharpie added the extra coverage and then once I put the stain over it again we were good!  I just love the way they turned out and like the distressed parts.  I'm loving were I finally decided to hang them too -- it did cause for a bit of a rearranging domino affect, but that is part of the fun!
See ya next week (or technically the end of this week...I'm a bit behind)

Friday, January 14, 2011

Week #1 - Project fail

Maybe it was due to all this that I didn't get anything done for my first week.  One would think quite the opposite and that I would dive headfirst into project-land.

But I'm thinking that it was this that actually slowed the creative mo-jo!  There has been a lot of sniffling, sneezing, coughing, congested, eye pressure, doctor visiting, pharmacy running, and nose wiping around here.
  So the most that I got done was this...cute kid and all :) [Technically the boy is a project all on it's own, but I mean really - I neither decorate with him or can take all the creative credit for him]


But one time I did make this - and I can tell ya how, super easy like :)
First I bought a super cheap set of twin sheets from target (I paid five whole dollars - that's a lot of fabric for not much moola).  I doubled the flat sheet over and wrapped it around the nap mat, then cut it to size (with a bit left on the edge).  I then turned the sheet inside out and used stitch witch to bond the whole thing together.  I found some soft minky blue fabric to add to the top (using the hemming/bonding tape again) and then slipped the mat in just like a pillow into the pillow case (needed to have it done this way so that it could slip off easily for washing - which it has held up to nicely!  I've only had to run an iron over one edge once!).  For the actual pillow I took one of the pillow case and put a small travel size pill into length wise (so I would only have to bond one side)  Cut the excess off and attach another minky piece (while inside out of course) and Voila!  You got yourself a nap mat cover and pillow case.  Now I know those aren't great directions and there are certainly no measurements - but this project was totally fly by the seat of my pants, like night before preschool started hand to "pull it together" type of project.  I essentially used what I had on hand (and didn't sew, which would be easy to do, b/c the singer and I had a knock down drag out fight and all I have to say is we both lost!  She is still in pieces and my brain is no more together at putting her back together than it was when I decided to take her apart)  But it just proves that you can do a whole lot with very little and it can still be done with ease. 
Supplies; iron, stitch witch, fabric, nap mat, scissors, pillow/stuffing

Thursday, January 6, 2011

Up in my head

There are a gazillion ideas to tackle; okay maybe it's more like 50...but if I hold off any longer there could easily be a gazillion ;)
This year I plan to tackle a bunch of them and blog about them here; maybe I'll be rearrange my furniture, painting walls, applying bead board and board & batten, adding more to my walls, and lots of other little projects.
I've taken a bit of time off from exerting my creativity - but with the new year comes new energy...so I'm  challenging myself to a project a week.  If I were super organized I'd have a pretty lil' list with all the projects on it - but you see I'm not so I don't have one.  Maybe I will someday and I'll post it all fancy like on the sidebar; today, however, is not that day.  Sitting here and professing this is as good as it gets.  So a new post will be coming at ya next week, so stop on back to see what I'm doing (if anyone is actually reading this)