Thursday, March 3, 2011

Easy Art...

I love little sayings around the house - I think it tells a lot about the person.  Our home has it's share of scripture and quotes all around, each one special to us for a season or just a good reminder.  Our MOPS group partners with a local Women's Clinic and a couple times a semester we try to do a project for them.  One of the things the clinic does is give gift baskets to new moms.  We thought something fun for the baby's room would be fun to put in these baskets.  My wheels started turning and I came up with some easy art for a babies room, door, etc...
Start of with a basic tile (16 cents)

Grab some scrapbook paper & print your favorite quotes, lyrics or verses on it

Trace your tile around the quote (some of the formatting may have to be done prior to printing)
Then brush some modge podge onto the tile (I'm didn't take a picture, b/c my hands were a bit tacky.)
A little goes a long way - once it's on and smooth place your scrapbook paper verse on.  SMOOTH IT OUT!! (I used my finger, but I'm sure a fancier tool would work too - a pot scraper, a pen, straight edge, etc..)
(someone please tell me that "he" on pink isn't going to be too much of an issue...I can't exactly change the words in the Bible, ya know?!)

Then cut some furniture pad felt - I bought the large rectangles of it and then will cut small strips


 After that you can cut the strip into 3 pieces and secure it onto the back (oops, the ribbon is on already).  This way it doesn't clang the door or make marks on the wall.


Then secure a piece of ribbon to the back with hot glue


You could also tie a bow and hot glue it to the front to spruce it up a bit :)

All 3 examples I made for the ladies to work from tomorrow - the last is my own artistic work.  I know similar to a elementary school aged child - no shame, just the way I roll :)  Except I used a sharpie - paint pens would work too, but I'm gonna guess crayon and washable markers aren't gonna fly on this.

You'll want to give them a quick spray of polyurethane to keep them from getting dinged up, losing their paper, or worse smudging the ink. 
(Dontcha love my garage floor backdrop, I fixed it up real special for ya)


Go ye forth and be creative!! :)
[Unless of course that isn't your thing and I'd love to whip some of these up for ya - monograms, family plaques, verses, and much more - the sky is the limit here...just holler!]


Wednesday, February 23, 2011

Week #4 - no accountability!!

My discipline is waning, doesn't say a lot of about me, since I'm supposedly only 4 weeks in - but whatev!
Last week this was my project - rather undertaking!  We had a fun Valentine's weekend, welcomed some family for a extended weekend visit and this week I've been playing catch up with the house, laundry, and enjoying the beautiful weather.  I suppose I could show you pictures of piles of unfolded laundry and then stacks of it folded as my project - but I'm hoping you have your own to look at (please, someone besides me falls into crazy masses of laundry - right?)  I think it's the curse of the creative brain -- can't really stick to redundant activities like washing, folding, putting away-ing.  I'd rather hide out in the craft room and play, check out some of my favorite blogs, or roam the aisles of craft stores. 
I'll play craft catch up next week -- after the house is all caught up (hhaaa!  oh the laughter that brings!)

Thursday, February 3, 2011

Week # 3 (I may be off a week) - Quick Craft!

This craft is so easy I dreamed it up while driving (which means it's super simple since I was driving safely, deej'n our drive, and probably answering one of the 30 bajillion toddler questions that I answer in a days time).

First I took this darling canvas and unwrapped it from a year ago (it was a gag gift, but I have on good record that it came from the dollar bin at T@rget - and can be found seasonally there and possibly even the $ Tree).  So anyways here ya have it....(nope there is nothing canvas about this canvas - it's paper)
So then I found some batting (surprised me that I even had it, can not even tell you how close I was to using a basic burp cloth - which I think is a perfect substitute)

I wrapped it around the canvas to give it a lil' extra thickness and stability and of course I secured it with hot glue! Watch out :)

Then I grabbed some scrap fabric (which was actually more challenging than it should be - I have some cute green stuff I had for another project, wonderful basic painter's drop clothe and then a napkin set I grabbed up from W@l-mart for maybe 25 cents - talk about your cheapo fabric)  Picking a fabric was actually the most time consuming part of this project.
Finally I picked the fabric and wrapped it around the canvas & batting - making a bit of a batting sandwich :)
My wrapping skills are really out of this world, right?

I intended to iron out the crease prior to wrapping it - oops!  I pulled as tight as I could, now all I can hope is that a quick steam and time will loosen the crease - shucks!

I found some ribbon in my stash-o-ribbon and hot glued it to the back and tied a bow at the top


A great place for all those little lovelies you want to see in your craft room, a little sweetie in your nursery, or a perfect place to display a recipe while cooking!
 You can also prop it up on a little easel -- see it there on the right!  Love it! [hate the glare on the other picture...ah well, can't win 'em all :)]


Sunday, January 23, 2011

Week #2 - Mirrors in Waiting

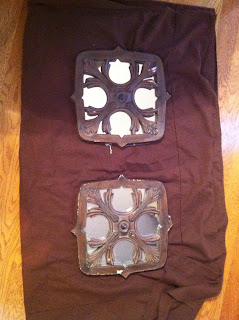
It's been months since I bought some cute mirrors at Trees & Trends.  I had some grand plans for them but time didn't allow and then once I'd have time I couldn't decided where I wanted to put them.  Last week tho, once the snow had melted I was getting antsy, I needed a project!  Currently I'm in the myhouseisnolongerdrowninginChristmasdecor&itfeelssonaked mode.  I do like stage because it lets me start fresh - but I get little crazy and then nothing is safe from paint, hot glue, and a nail [really I took something I use on a regular basis and decided I just HAD to hang in on my wall...I may regret that, but so far so good :)]
Where were we? Oh right mirrors...So I bought these lovely little numbers a few months ago.
 Oh sure they look great, but look closer...see not so great!
They were the last two left and it looks like they'd seen better days.  When I saw them I thought, "ooo I could totally change them, well if they are a good price" 
Unfortunately THIS is not a good price to me - especially when I'm gonna have to make them look much better.  However, I did feel pretty good since they were marked down from $20. So I kindly asked the clerk if there was any possible way that I could get a discount (sometimes I don't know what comes over me, I think it's all the spray paint fumes that have gone to my head).  By assertive I was and convincing I must of been cause that sweet gal asked her boss and bam - they gave me a discount!  So I walked away with both of these for $14 - that was good for me (I'm pretty sure "me" came back around and was feeling mighty awful for even asking for money off)
So last week I brought an old tablecloth out, put the mirrors on them and got my glaze out.  I was really hoping that the glaze would match perfectly to fill the big knicks.  Buuuut, not so much.  (see that white peeking out there...argh!)
 So then I thought - "oh I have stain left from the table - that would probably cover a bit better and at least stain the white" so I got that out.  It worked much better but I had to rub it over the entire mirror.  Still when I was rubbing on and rubbing off large white spots were peeking through.  
So like any good crafter I resorted to the cure all - enter the brown sharpie!  Oh yay, no we're talking baby!  That sharpie added the extra coverage and then once I put the stain over it again we were good!  I just love the way they turned out and like the distressed parts.  I'm loving were I finally decided to hang them too -- it did cause for a bit of a rearranging domino affect, but that is part of the fun!
See ya next week (or technically the end of this week...I'm a bit behind)


Friday, January 14, 2011

Week #1 - Project fail

Maybe it was due to all this that I didn't get anything done for my first week.  One would think quite the opposite and that I would dive headfirst into project-land.

But I'm thinking that it was this that actually slowed the creative mo-jo!  There has been a lot of sniffling, sneezing, coughing, congested, eye pressure, doctor visiting, pharmacy running, and nose wiping around here.
  So the most that I got done was this...cute kid and all :) [Technically the boy is a project all on it's own, but I mean really - I neither decorate with him or can take all the creative credit for him]


But one time I did make this - and I can tell ya how, super easy like :)
First I bought a super cheap set of twin sheets from target (I paid five whole dollars - that's a lot of fabric for not much moola).  I doubled the flat sheet over and wrapped it around the nap mat, then cut it to size (with a bit left on the edge).  I then turned the sheet inside out and used stitch witch to bond the whole thing together.  I found some soft minky blue fabric to add to the top (using the hemming/bonding tape again) and then slipped the mat in just like a pillow into the pillow case (needed to have it done this way so that it could slip off easily for washing - which it has held up to nicely!  I've only had to run an iron over one edge once!).  For the actual pillow I took one of the pillow case and put a small travel size pill into length wise (so I would only have to bond one side)  Cut the excess off and attach another minky piece (while inside out of course) and Voila!  You got yourself a nap mat cover and pillow case.  Now I know those aren't great directions and there are certainly no measurements - but this project was totally fly by the seat of my pants, like night before preschool started hand to "pull it together" type of project.  I essentially used what I had on hand (and didn't sew, which would be easy to do, b/c the singer and I had a knock down drag out fight and all I have to say is we both lost!  She is still in pieces and my brain is no more together at putting her back together than it was when I decided to take her apart)  But it just proves that you can do a whole lot with very little and it can still be done with ease. 
Supplies; iron, stitch witch, fabric, nap mat, scissors, pillow/stuffing

Thursday, January 6, 2011

Up in my head

There are a gazillion ideas to tackle; okay maybe it's more like 50...but if I hold off any longer there could easily be a gazillion ;)
This year I plan to tackle a bunch of them and blog about them here; maybe I'll be rearrange my furniture, painting walls, applying bead board and board & batten, adding more to my walls, and lots of other little projects.
I've taken a bit of time off from exerting my creativity - but with the new year comes new energy...so I'm  challenging myself to a project a week.  If I were super organized I'd have a pretty lil' list with all the projects on it - but you see I'm not so I don't have one.  Maybe I will someday and I'll post it all fancy like on the sidebar; today, however, is not that day.  Sitting here and professing this is as good as it gets.  So a new post will be coming at ya next week, so stop on back to see what I'm doing (if anyone is actually reading this)

Wednesday, October 27, 2010

FEATURED!!

Hop over to Better After and see our Kitchen Table redo, have to admit I'm a bit giddy about being featured! ;)